This article was originally written for the GW site but my mail was not answered and so I use this article here.
Have a lot of fun.
 This scenery project sheet describes how to make the perfect Mortheim cover consisting of barrels and crates.
Because we will need a lot of them we will only make one original and then cast a huge amount of copies.
This scenery project sheet describes how to make the perfect Mortheim cover consisting of barrels and crates.
Because we will need a lot of them we will only make one original and then cast a huge amount of copies.
You will need:
- All kind of basic equipment like knife brush and so on.
- Balsa Wood
- Green Stuff or Modeling Clay
- Some sculpting tools
- Mold build material such as two component silicon rubber and plaster de paris
- A modeling knife
- The following Citadel paints: Dark Angels Green, Goblin Green, Bestial Brown, Chainmail and some Citadel Chaos Black undercoat spray.
- A strip of card
- Some sand and flock for the base
- Scissors
- PVA glue
Making the barrels and crates
Step 1
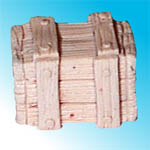
First we want to make the barrels and crates. Start with the crate. It can be easily build out of some balsa wood stripes. You just have to glue them together and voila.
Step 2
The barrel is more difficult.
I have build some barrels out of balsa but it is not worth the time.
We better sculpt it.
I did use Fimo for this, but you can use just about anything you want.
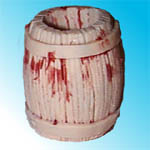
Grab a pen and roll some green stuff around it.
Sculpt a barrel form (thinner at the ends).
Use a small knife or some sculpting tool to engrave a wood texture.
Make some small stripes of green stuff for the steel bands that hold the barrel together.
Place them around the upper and lower end of the barrel and you are finished.
It took me about fifteen minutes to model the perfect barrel, you just have to know the trick.
|
|
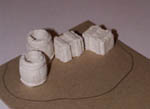
| The red stripes are from the mold material. | Sculpted like the barrel |
Step 3
You can sculpt as many barrels and crates as you like but there is a better way.
We will cast them out of plaster de paris.
For this you need some material for the mold.
I used all kind of mold building material and they all work.
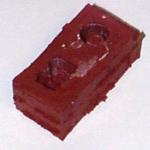
My mold is made out of a silicon rubber.
Make a small box and place the originals in it.
Follow the instructions to mix the rubber and pour it slowly in the box.
When the rubber has cured you are finished.
Your first casting mould ready to use.
Tip:
A good book on all kind of modeling techniques and also with a introduction to mold making is Stephen Paines How to Build Dioramas
, ISBN 0-89024-195-3
Step 4
Ok, the mold is finished and now we want to cast a whole warehouse of barrels and crates.
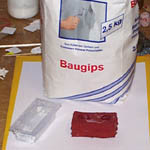
To mix the plaster get one of the small plastic containers that come with every plastic regiment
Fill a little bit of water in.
Fill as much plaster in as will get wet.
Stir a little bit.
Fill it in your mold.
Shake the mold a little bit to get the air bubbles out.
For tips how to cast all kind of things out of plaster de paris and mold making look at
this site.
|
|
| My casting mold. Barrel and crate are next to another. | My working table |
Making the base
Step 5
If you are this far you should have about 143 barrels and crates lying before you.
If you are in a hurry you can just paint them and stack them in neat heaps all over
Mortheim.
But I will show you how to make them even nicer.
Cut out some thick cardboard, large enough for three or four barrels.
Glue some of your barrels on a cardboard
(remember: if they are lower than 1 inch they will not protect against charging).
Then cut some thing cardboard to small square pieces. They will be the cobble stones.
Also glue them to the base.
At last glue some sand to the base between the cobble stones and around the barrels.

|
|
| Some of the barrels and crates. Even the broken ones can have their use. | Planing the base. |
Step 6
Now its time to paint the base.
Start by spraying all with Citadel Black spray.
When this has dried, drybrush the base with grey and the barrels with Bestial Brown.
The steel rings on the barrels get a little bit of Chainmail.
Let the Bestial Brown shine through to represent rust.
Tip:
You can add some green spots representing lichen or mould with Dark Angels Green and
Goblin Green. For more vegetation use some static grass.
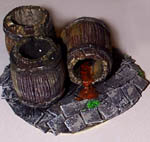
Step 7
Here is a little bit of inspiration for your bases. Let a little grass grow between the stones and around the barrels using flock.Some of the barrels can be filled with stones, wood or some liquid.
Liquid can be made with a little bit of glue. This gives a nice shiny finish.
Maybe there is a skull lying around somewhere or rat looking for something to eat.
Some arrows may be stuck around the cover (That's what it is for).
|
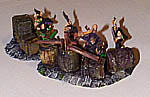
|
| A finished base with a closeup on the cobble stones. | Some gutless Skaven hiding behind the crates. |